Vanguard Character Tool – Genetics
Vanguard shipped with 19 unique races (x 2 genders). When the decision was made to revamp the player characters a year after ship, it was quite a daunting feeling. Multiply the number of items in the game (helmets, breast plates, pants, shirts etc) that would be affected by a shape change in the body and head. The number equals out to be a sizable challenge. Then you add the fact that you and one more character artist would be able to spend the majority of time on it. You realize that it is not possible without a full suite of tools.
vgGenetics is the base of that suite, and ended up around 5500 lines of mel code. It also has a few stand alone procedures that are hooked in. During the PC revamp phase I developed a good size of other tools and utilities, but talking about the base of vgGenetics will be long enough ![]() . The foundation of this tool was laid by my former colleague and good friend Martin Karlsson.
. The foundation of this tool was laid by my former colleague and good friend Martin Karlsson.

The basic functionality of the tool, it let’s us preview all the PC models by clicking the race buttons along with the skeletal changes that takes place blend shapes are also set in the background, there is also a third mesh layer that is set and that is the weight carrier. We can also jump seamlessly between male and female…

vgGenetics has a base scene which is the start scene of any asset that we want to utilize the functionality of this tool. I set up a section of user scenes that can be created for mainly auto generating helmets, but can also be used for other assets where we need one per race and gender.

To test how well an asset works with other races, you would wrap attach it.

If there were minor interpenetration when going to another race, I had a tweak node present. If you right click on the race icon, there is a pop up menu to set the mesh, select the tweak node and set the tweak. The tweak values were then retained for when it was time for mass export.

To further test how well meshes worked in game, I wrote a customization emulation tools that mimicked our in game customization. In the UI, there is a weight section, were the user would hit bind button, copy button (copies weights from the weight carrier to helm), and save to disc button. The Helm Tst, button would at any point transfer the wrapped mesh to a skeletal bound mesh and bring up the customization UI, were the user could randomize customization results quickly.

The part I am probably the most proud over is the vgGenetics exporter and the functionality built into the exporter UI. From one modeled helmet, the exporter would generate all the humanoid helmets on the fly, export out and import into each race’s corresponding Maya scene, bind and assign the weights, assign to layer and export into our game engine. The UI also syncs selected race/scene types and checks them out of Perforce (our source control software).
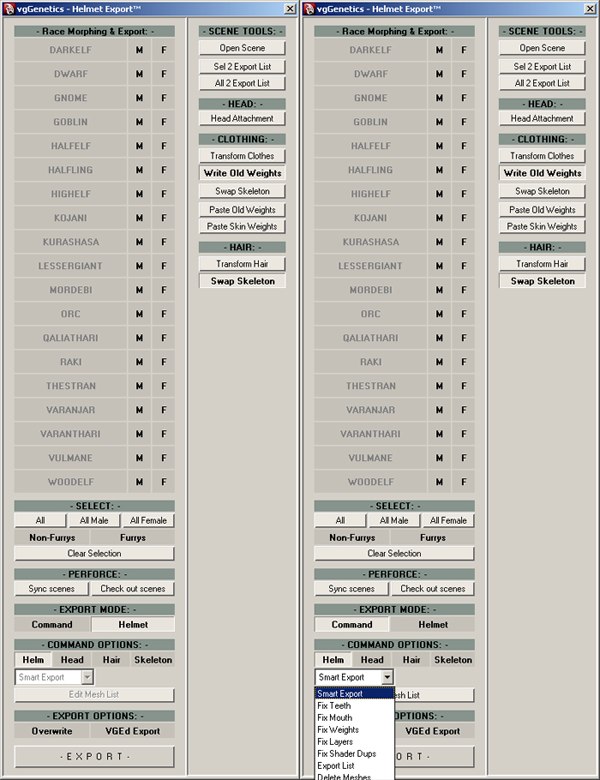
To the right, you can also see that a command mode allows us to batch precess selected race/scene types with whatever MEL procedure. It got old really quickly to go into all the scenes to fix some unforeseen issue. There is also an additional panel to the right were a number of other utilities were plugged in.
The last thing I am going to talk about when it comes to this tool is the race definator. When we were going to tweak the skeleton and change it for certain races (and thus changing the appearance of the bodies), it was very painful to dig around in the hypergraph/outliner (especially when you wanted the changes to happen on both sides). The race definator analyzed the skeleton and divvied up the controls per body area. It also automatically applied changes to booth sides. You could then simply save out the new skeletal definition and apply it in the skeleton scene (we are still in the vgGenetics base scene). That way we could easily compare skeletal definitions and experiment a little easier. There is also a filter to see only the bones that were changed between the base skeleton definition and the race in question when the characters were originally implemented.

/Christian Akesson

